
Courtesy of the MABRC
Casting a track in the field (See presentation slides at bottom of article)
You come across a track, and it appears to be a large human-shaped footprint. You may have found a Bigfoot track, what do you do? This article will show the MABRC Researcher how to identify, document and cast a Bigfoot track.
What type of track
First, you must confirm what type of track it is, we’ve included a chart here with many of the more commonly found tracks in the woods.
Inspect the track
When you find a track, you must inspect it and make sure it is an actual Bigfoot track, and not one that is misidentified, human-made or hoaxed.
The following steps should be followed.
Variation - If multiple prints are found, look for variations such as toe position, shape, partial or full prints, etc. A living foot will not make the same print twice. A footprint is not what the foot looks like, but what it did when it hit the ground. Artificial feet are likely to look relatively the same print-to-print.
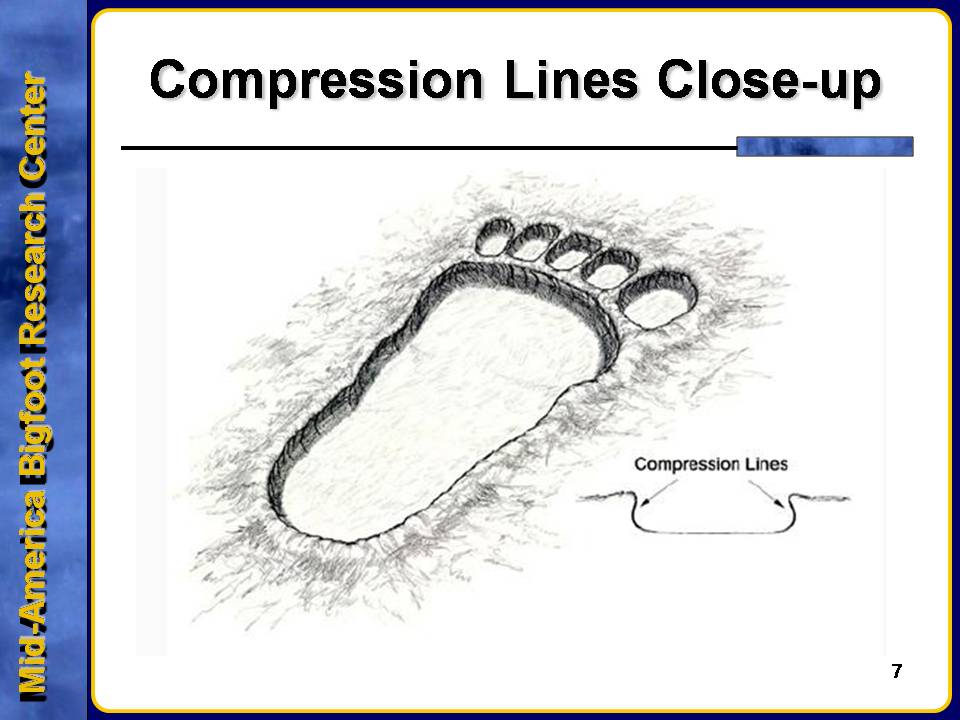
Compression Lines - Tiny cracks in the inner top-most part of a track are called compression lines, and are an indicator that the track was made by a flexible foot.
Impact Ridges - These are cracks that form on the outside of a track, and are caused when something hard and rigid, like wooden feet, are stamped into the ground.
Manipulation - Check to see if the print has possibly been tampered with. Has debris been removed to make the track clearer? Are there finger marks or obvious signs of shaping? Is the soil pushed and formed in ways that seem unnatural?
Human Activity - Are there signs of human presence in the area? Is the suspect print in a place where someone would think it would be noticed? In a picnic area, on a well-used trail, etc.? What is the likelihood that someone would choose this place of all places to perpetrate a hoax?
Habitat - Is the area involved likely Sasquatch habitat? Is there a history of sightings or track finds in the area?
Who knows you are there? - Who knows where you are going? Do any of your acquaintances or family members like to trick you? Maybe you know someone who wants to trick you? Could they have known where you would be?
A hoaxed track may be extremely convincing, so your best option is to document it as thoroughly as possible. You may not be convinced it is a hoax at first, but proper documentation and peer review can help you make a more informed decision.
Conclusion - Do not be so excited as to miss the little details. Regardless of what you think, if the evidence is enough to convince you that it deserves futher investigation, then do your best to document it in as much detail as possible with multiple photographs, measurements, and field notes containing time of day, date, location, and anything else worth noting, as mentioned previously. It is of the utmost importance that when presenting evidence for further review you are able to accurately portray the evidence in question. The fewer questions that need to be asked, the better results you are going to have.
The “Media”
There are several types of media or material to use in casting tracks.
* Plaster of Paris - not recommended as it is too brittle to last.* Dental Stone - Used by the F.B.I.* Hydrocal - Most commonly used for casting by researchers.* Ultracal - Requires less water to mix.
The “Tools”
* Ruler/tape measure/photographic ruler* 35 mm or Digital Camera* Casting media* Water* Bucket or other suitable container.* Mixing sticks* Latex gloves* Barriers* Hairspray or other spray or aerosol fixative* Journal
The “Basics”
Place measuring device along length and width of track. Take pictures and make sure the measuring units are viewable.
When measuring the width, do both the front and back of the track, so that this information is documented.
With these details, write them down in your journal for further information along with the cast.Take these pictures from all angles but do not place baby powder or flour into the track to make it more visible. If the track is not viewable with the camera, chances are, it’s not worth casting.
Preparing to cast
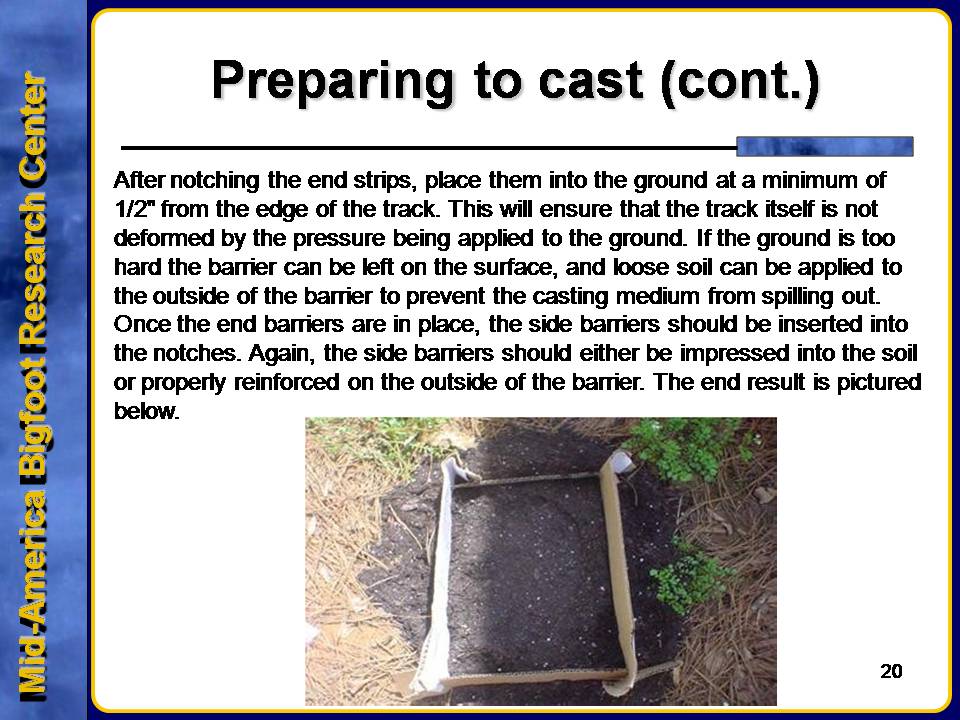
Before mixing your casting media and pouring the cast, the cast should first be properly prepared. In order to ensure a quality cast, a barrier should be erected around the track. One of the simplest barriers available is cardboard strips. These strips should be pre-cut to varying lengths. Once the appropriate length strips have been selected, you should notch the two end strips as illustrated below.
After notching the end strips, place them into the ground at a minimum of 1/2 “ from the edge of the track. This will insure that the track itself is not deformed by the pressure being applied to the ground. If the ground is too hard, the barrier can be left on the surface, and loose soil can be applied to the outside of the barrier to prevent the casting media from spilling out. Once the end barriers are in place, the side barriers should be inserted into the notches. Again, the side barriers should either be impressed into the soil or properly reinforced on the outside of the barrier. The end result is pictured here.
Mixing the medium
Now that you have prepared the track, it is time to mix the media. Most gypsum manufacturers recommend the use of latex gloves when handling and mixing media and this recommendation is carried over here. Another important rule to remember is always add the medium to water, never the other way around. Whether you are using pre-measured amounts of the two or simply “eyeing it”, the medium should be slowly poured into the water while continuously stirring the two with a mixing stick.
Once properly mixed, the slurry should have a batter-like consistency. A slurry that is too thin will be harder to contain and may not properly set up. A slurry that is too thick will not capture as fine a detail and may actually damage or alter the track during the pouring process. Before pouring the slurry, you should also tap the sides of the container until all bubbles have been discharged from the slurry.
Pouring the cast
The track is prepared, the slurry is mixed, and now it is time to pour the cast. In later installments we plan on dealing with splash casting, but for the purpose of this primer we will use a simple pour. The slurry should be carefully poured into the track at a minimum height. In my personal experience, I’ve poured directly into the heel or center of the track, or poured to the side and allowed the slurry to seep into the track. Unless the soul is especially light or dry, pouring directly into the cast as a minimum height should not affect it. Since a direct pour is the most common method employed, it is the one we will use for this demonstration.
As noted, the slurry should be poured at a minimum height and at a slow pace. The slurry should be allowed to slowly fill the track and the area between the track and barrier.
Note that the thicker the layer of slurry, the stronger the cast will be, but this will also increase drying time. Some online articles have suggested using sticks or other reinforcement to the casting media. If you are using a quality media such as Hydrocal or Ultracal, this is not necessary. In fact, adding artificats to the casting media can actually jeopardize the cast as they may introduce air pockets. These air pockets not only weaken the cast, but can also cause it to crack or break under changes in temperature or pressure.
Once the cast is poured, the waiting begins. One should refer to the manufacturers’ recommendations for the amount of time required for a cast to dry. Hardening times will vary based on type of casting media, thickness of the slurry, soil conditions, temperature, and other factors. If you are unsure, a good rule of thumb is to wait until the top surface of the cast has completely dried, then allow an additional ten to fifteen minutes. Keep in mind that you’ll only get one chance to cast the track, and therefore it is better to err on the side of caution than to rush and attempt to pull a cast before it’s ready.
Lifting the cast
When the time comes to pull the cast, gently insert your fingers under the two longest sides of the cast. This is another advantage of employing a barrier during a casting, as it will allo a wide enough surface area around the cast to exert pressure against it without actually touching the print cast itself.
Using a light rocking motion, slowly work the cast free from the soil. Once the cast is free, you should not attempt to clean it, as the casting media may still be soft enough to be damaged by even slight contact. A cast should always be handled from the top, and never from the print side. Gently wrap the cast, dirt and all in a towel or bag and stow it safely for transportation out of the area.
Cleaning the cast
The cast should be allowed to sit overnight before being cleaned. A soft brush can be used to remove the majority of dirt from the surface. Again, always handle the cast from the top side.
Assuming you have used a quality grade gypsum cement like Hydrocal or Dental Stone, the cast can then be washed. When washing a cast, avoid the use of any types of solvents or cleaners.
Warm water and a small amount of mild dish soap is more than adequate for these purposes. You should never scrub the surface of the cast, as this could potentially destroy any details. Instead, allow the water to gently run over the face of the cast while employing the same light brush strokes used when removing the loose dirt. After cleaning, set the cast aside somewhere safe and allow it to dry.
Trackways
A trackway is a set of impressions left by an animal over an extended distance. Even a set of 3 prints is considered a trackway.
Bigfoot trackways are very rare, but in the event you encounter one, documenting and casting these trackways are necessarily important to be done correctly.
Although many suspect the tracks shown here being measured by John Green to have been hoaxed by Ray Wallace, you should note that John is measuring the stride length between the tracks, trying to debunk whether they are hoaxed tracks or not.
Documenting trackways
* Measure all tracks found, width, length and depth.
* Photograph all tracks, including photos of the entire trackway, using small marker flags to signify the location of each track in the photo.
* Measure the stride length between the tracks.
* Note any obstacles that would cause deviation of trackway.
* Note direction of trackway.
* Note weather conditions.
Casting trackways
* Always cast right and left tracks, multiple tracks of each.
* Always cast more than one track.


No comments:
Post a Comment