Featured Post

Welcome to the Bigfoot Field Guide Blog

This is the official Bigfoot Field Guide Blog, where we will be posting information for those who don't use Facebook.  The Bigfoot Field...

Showing posts with label guide. Show all posts

Tuesday, August 23, 2016

Procedure after finding a Track

Courtesy of the MABRC


Procedure after finding a Track

Note location, GPS if available in field journal, along with date & time.

Using a surveyors flag or other such, mark the track. (note: do so approx. 1 foot away from track so as not to damage track 

Visually scan the area for additional tracks, if found flag as above. 

Using the track direction search for other tracks If two or more tracks are found (track way) measure both step and stride. 

Do so on several.

Note in field journal.

If only two tracks are found, set up a tracking stick and search for other tracks.

In doing all the above take CARE not to destroy or disturb any of the tracks. Ask bf to lift foot so you can get a better look at track (sorry couldn't help my self).

Number a 3X5 card and lay about 2" away from the track Take minimum of 4 pictures, with 3X5 card visible in photo.

Get on ground and visually examine track, do not touch and take care not to disturb.

Use flash light at different angles to high light any possible points of interest.

If points of interest found, do close up photos of those points Take photos from directly above track, with and with out flash, a couple of each.

Take measurements

If using a photo scale, lay it next to the track and take a photo from directly above. (angles will distort getting a true measurement to varying degrees.) If using a tape measure, carefully lay a stick at both ends, ones long enough to reach the tape measure. Measure distance between the two sticks. ( 3 bamboo skewers work nicely, one next to the track and the other two at the ends, by using the one next to the track it is easier to keep the two end ones parallel to each other for a truer measurement) Repeat process for width measurements

* If using Track Caliper, lay next to track and carefully adjust so the top and bottom just touch the edge.

* No matter what you are using take care not to disturb the track

* If measuring device of choice in place take photos, minimum of 4, using effort so measurements are readable in the photo.

If casting, proceed to casting procedure

Friday, August 19, 2016

Latent Print Collection


Courtesy of the MABRC


The intention behind the guidance given by the MABRC on latent print collection is not to train researchers to be latent print examiners, nor to be crime scene investigators. Rather the guidance provided here is to give researchers a means of using makeshift equipment and proper protocols in the effort to successfully collect latent prints of suspected Sasquatch should the opportunity present itself.

Researchers should be aware that it is difficult at best, to substitute for professional fingerprint equipment, however the technique and guidance provided here can successfully lift latent prints under good conditions.

The list of supplies that a researcher will need a very simple and inexpensive.

-- A small, empty squeeze bottle (similar to an eye drop bottle, preferably with a screw off top)
-- A bright flashlight 
-- A two inch wide roll of clear tape
-- A black or dark colored plastic sheet (transparency sheets work perfectly)
-- A fine powder such as talc or cake flour
-- A camera lens brush with fine hair at one end, and a bulb at the other end (similar to a mini turkey boaster)
Researchers should be aware that the probability of encountering a Sasquatch print that is suitable to be lifted is minimal, and more than likely will either be encountered on a window, vehicle surface, or other nonporous surfaces. Prints will most readily be apparent after the surface has been coated in a fine dust, such as a vehicle that was used in field research.

Researchers should follow the following protocol in order to minimize contaminating the print, and aid in the successful recovery of the observed sample.

1. Photograph the print or hand mark of the surface prior to conducting any attempt at recovery. The use of a photographic scale or other measuring device is vital in the attempt to document the print.

2. If the print is difficult to see, attempt to use the flashlight at different angles in order to highlight the print for photographing. Dependent upon the camera the researcher uses, a flash may or may not be needed.

3. Take several photos from various angles and distances.

4. Annotate in your research journal what the photo is of. (The researcher may need to describe what is in the photo for later recollection.)

5. The researcher should now put on a pair of powder free latex or nitrile gloves in order to prevent contaminating the print, or worse yet, leaving one of his/her own, and lifting it as the specimen.

6. The small squeeze bottle should be filled approximately one-third to one-half full of the fine powder. It is imperative that the bottle be capped after every use in order to prevent moisture from absorbing into the powder and making it difficult to use. (A cheap trick to prevent moisture from sticking the powder together is to add a little dry, white rice to bottle)

7. Firmly shake the bottle a few times in order create a dust within the bottle, then remove the cap and softly squeeze the bottle away from the suspected print.

8. Pay attention to how much dust comes out of the bottle when squeezed, and at what direction the air is carrying the dust. Seldom is the air completely still, so pay attention to the direction it flows, and how fast it settles.

9. Once you have determined the air flow direction, the rate of descent of the dust, and how much dust exits the bottle with each squeeze, move to the opposite side of the print from which the air is flowing.

10. Softly squeeze the bottle and attempt to drift the dust onto the print. The key here is to lightly dust the print with powder, but not so much that the surface is obscured. (This is something that you can practice with at home before going to the field)

(If more powder is needed to dust the print, ensure that you continue to shake the bottle before squeezing it)

11. Using the lens brush, softly squeeze the bulb in order to blow air out the brush, and blow away any excess powder. Ensure that the brush DOES NOT touch the print at this point.

12. Use the flashlight from various angles to check and see if a print is visible under the powder.

13. If a print is apparent, but not clear, delicately use just the tip of the brush and softly brush it across the print to further remove any excess powder. Extreme care should be used on this step as it is very easy to destroy a print using the brush.

14. Using the roll of tape, start the tape and double back the end in order to make it easier to remove later.

15. Tack the beginning edge of the tape approximately two inches past the print, and with one hand controlling the tape roll, use the other hand to secure the tape to the surface.

16. Using one finger, slide it down the non-adhesive side of the tape, securing it to the surface and the roll of tape is maintained taut using the other hand. It is vital that the tape not have any kink, wrinkles, or air bubbles under it as it is secured to the surface.

17. Once the tape has been secured successfully two inches past the print, cut the tape and secure the end to the surface.

18. Using the transparency, or other similar dark material, cut a piece that is approximately one inch larger on all sides than the print that is attempting to be lifted.

19. If using a transparency that has been printed on, ensure to use the opposite side which will be shiny and non-porous. It should be noted that paper does not serve as a good medium when using this method.

20. Place the “card” near the tape and use the fingers of one hand to secure the flat end of the tape to the surface. 
Using the other hand, grasp the doubled tag of tape and slowly begin to peel it from the surface. Ensure that the tape is peeled back smoothly, firmly, and evenly as it is very easy to ruin a print at this point.

21. Once the tape has been removed and is secured using both hands, tack the flat end of the tape back to the surface and to one end of the “card” simultaneously.


22. Using one hand to control the tape, use one finger of the other hand to firmly slide against the non-adhesive side of the tape working your way up the card. Ensure that the tape is secured to the card smoothly, evenly and firmly. Kinks, wrinkles, or air bubbles can destroy the print.

23. Once the tape is completely secured to the “card”, remove it from the surface and trim any excess tape from all four sides.

24. Using a label, place it on the back of the card and label it with the appropriate tag number. Once this is done, fill out the specimen collection form and label it with the tag number from the print, and add this tag number to your research journal entry.

The researcher should be aware that usually a print is not able to be lifted again, once it has been compromised by the tape. Additionally, if there is more than one print lifted from the same location, each print will receive a different tag number, however only one specimen collection form is needed, but do include all the tag numbers from all samples on that form. All tag numbers should also be entered into your journal entry.

Thursday, August 11, 2016

National Sighting Report Database

Courtesy of the MABRC


One little known feature that the MABRC has maintained for quite a few years is their National Sightings Database, in which they have taken sighting reports from all the sources that they can locate, and placed them in an easy to use format, with search capability.  Some of the main locations that reports were pulled from include but not limited to:

(BFRO) Bigfoot Field Researchers Organization
(GCBRO) Gulf Coast Bigfoot Research Organization
(TBRC) Texas Bigfoot Research Conservancy
(NAWAC) North American Woodape Conservancy
(OBF) Oregon Bigfoot 
(IBS) International Bigfoot Society
(BFE) Bigfoot Encounters


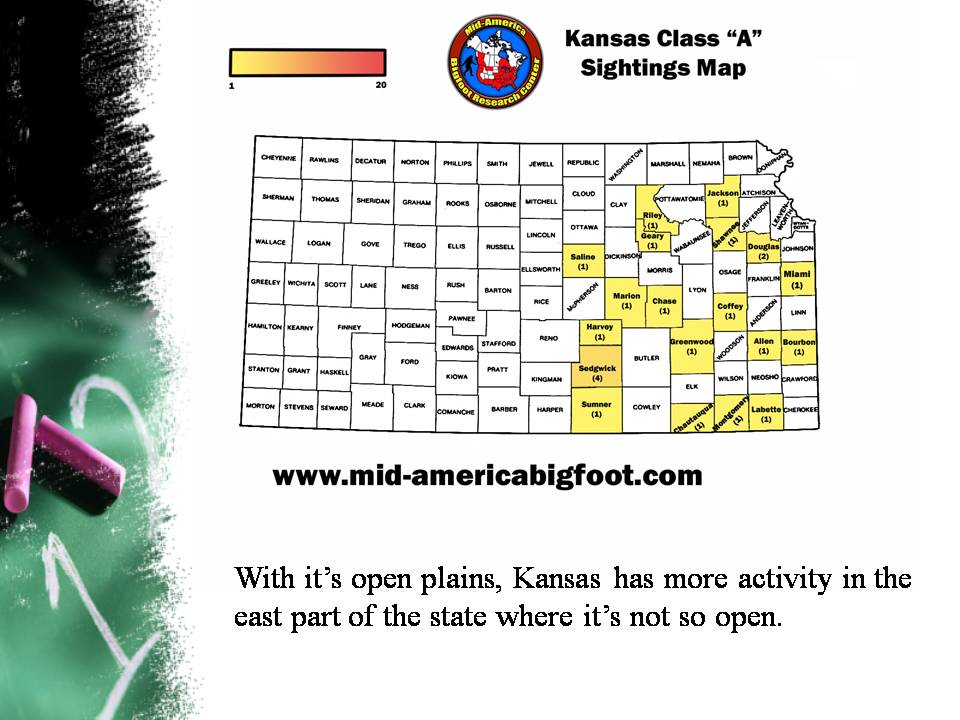
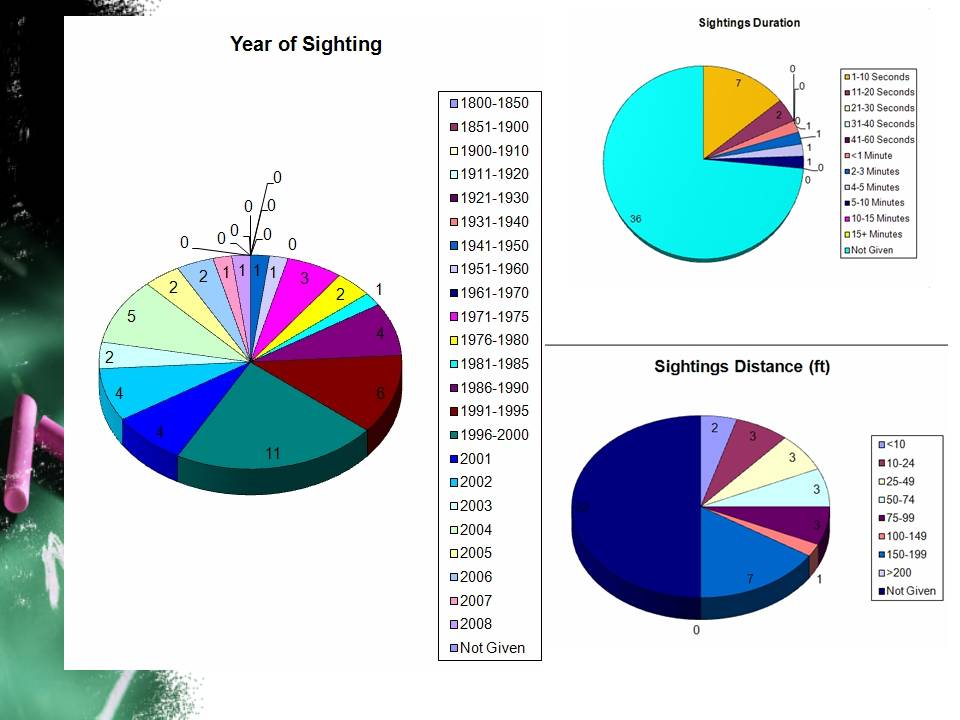
Books like the Bigfoot Casebook are also searched for sighting reports and placed on the forums in the database.  And the late John Green's sighting reports database is being added too.  The MABRC also has a presentation that explains the need for folks to turn in sighting reports, and they were generous enough to give us permission to post it here.


Sunday, August 7, 2016

BFG - Using Google Earth in Bigfoot Research

Have you ever wondered how to use Google Earth in your research?  Well, the Bigfoot Field Guide put together this great tutorial several years back and made it available for free to anyone who wanted to know, here is the download link to get this great guide.